In the past couple weeks I have gotten into a bit of a woodworking kick. Nothing stupendous, but I have enjoyed watching Rex Kreuger’s Woodworking For Humans series on YouTube and this was partly the impetus crossed with my successes and failures around making my desktop. Explanations aside; I have set-to-right a couple of things.
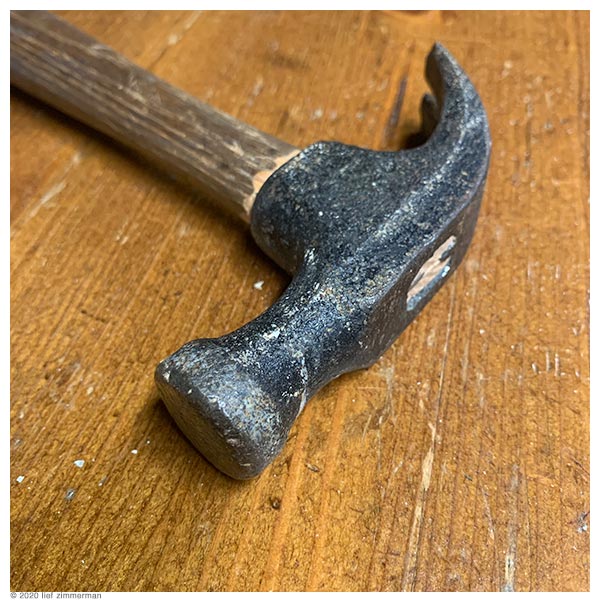
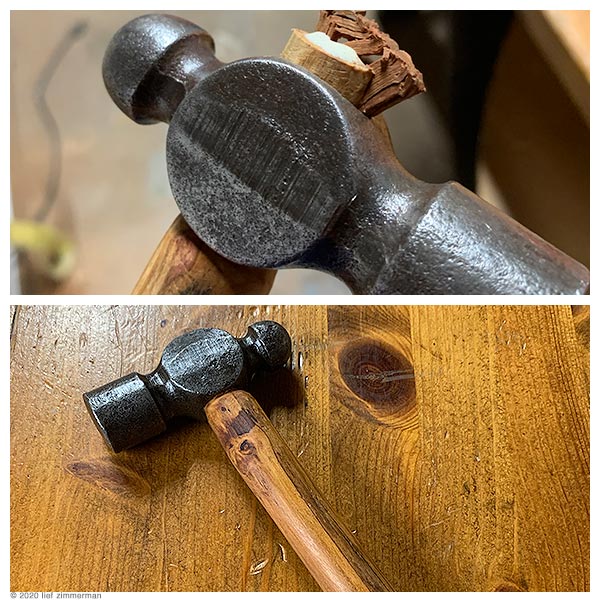
Firstly, I quickly fixed the broken handle on a hammer I acquired from my maternal grandfather. It wasn’t used a bunch, and I think it is a pretty cheap tool generally speaking, but I was happy to re-set the existing handle, albeit a little shorter than it was originally. I didn’t try to polish the finish on this one because I didn’t think it would work – the metal looks drop-cast (die-cast?) and I don’t really think a wire brush treatment would change anything. Further, the age and origin of this hammer is more important to me than it’s use and the patina of it reminds me of that.
I have had a ‘failed’ cherry picture frame, given to me by a professional because it wasn’t good enough for his needs, kicking around in my shop for probably 15 years. didn’t ever have the desire or fine-skill necessary to attempt to finish the job. As it turns out the thing was so square and solid that each corner can make a pretty good little try-square. The only missing feature now is that the tongue should be thinner than the stock – to allow squaring up on edges. They do work well for outside and inside ‘trying’.
Try squares (or try planes) appear to be associated with the origin of the idiom: Tried and True
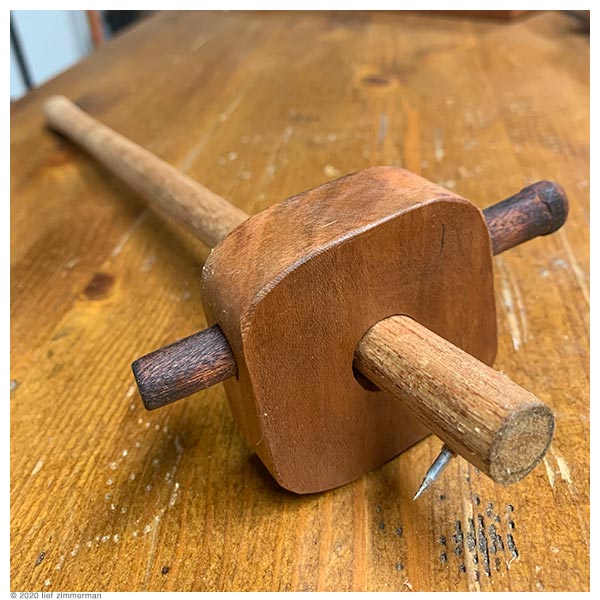
After those simple tasks (couple cuts and some shellac) I took on making a marking guage. A valuable tool that both Rex and other YouTubers present as a critical component of a woodworking shop. I was convinced and gave it a shot. I also started with a piece of cherry from the same frame.
It should work well enough but there are at least two problems with my first attempt…three actually.
The Stem is a bit undersized for the hole – I got too far down the road shaving it with my rasp. This makes things a little sloppy. I can fix it by making a new stem someday, if and when it becomes a problem.
The ThumbPin is a little hard to secure against the stem. I should be able to make this better also with an improved stem which I’d make sure is a bit bigger and has a proper flat-spot on one side (forgot that bit before I assembled it). When I do that – my thumb pin may be a bit short to secure it tightly. Hard to say really, I’ll have to use it a while to decide.
I made the Thumb Pin black, by torching it. Doesn’t hurt anything but I think blackened cherry is uglier than plain cherry.
One last note – crossing over my hobbies – the spike on this guage is made from an old bicycle spoke.
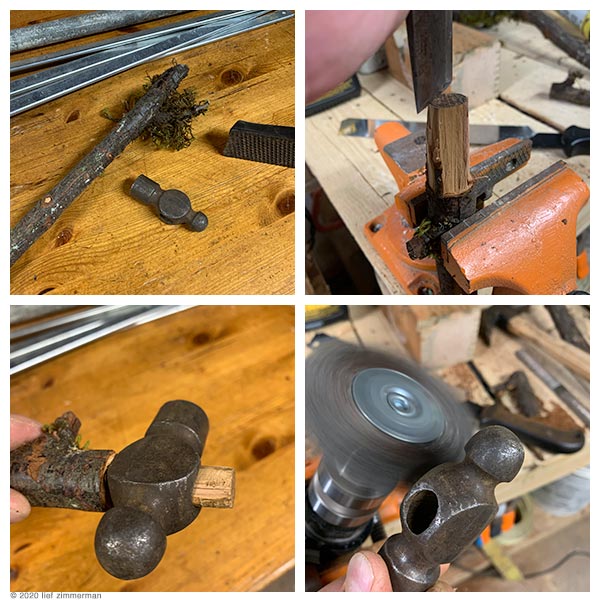
This is not tagged with Things I Have Broken. Although it is possible I broke the handle that went along with this hammer-head, I may have just found it in my travels. I don’t recall ever owning a functional ball peen hammer. Either way, I fixed it.
I used a near-sized stick from a cherry tree I cut down last spring. Following some YouTuber guidance I slowly chiseled down the bit that goes in the hole until it fit all the way down snugly. Then I rasped away the bark, did some light sanding, and ‘polished’ the rust away from the head with a wire brush.
One thing I noticed…I need a wood vise. (BopOp – I only barely nicked that really sharp chisel blade one time when the stick came loose.) Oh yeah – and I should make myself a sharpening station too.
After the handle was sanded smooth I cut a slot in the top, sliced off teensy piece of Brazilian cherry I’ve had for many years, tapped it in till it broke, and cut it off clean with a coping saw.
There is a small check in the handle; but that probably won’t matter for a peening hammer. If it does, well this only took about 90 minutes; next time perhaps 45. The slight curve to the handle may be more problematic once I start using it.
A few weeks ago my employer gave all newly-remote workers an unexpected payday. A moderate little bonus, no strings, to help pay for anything we wanted but ostensibly designed to make our continued work-from-home existence better.
I chose to purchase an electric sit-stand desk. I’ve been standing at my workstation since about 1998 and I even made my own standing work-station/desk when my previous employer refused the $300 expense request for a standing desk in my office.
But I digress.
I liked the frame and design of the UpLift brand and the tabletops were fine…but I wanted it to be ‘mine’. I was inspired by this design (https://www.youtube.com/watch?v=UXffPgX-s8E) but I’m no professional woodworker and I don’t have 1.21 gigawatts of skateboard decking…so I’ll have to come up with another idea.
oh and I also wanted to play with epoxy – so there is that.
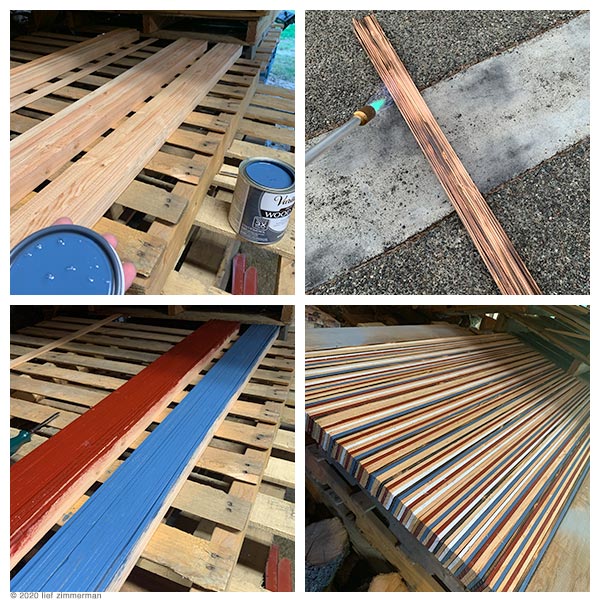
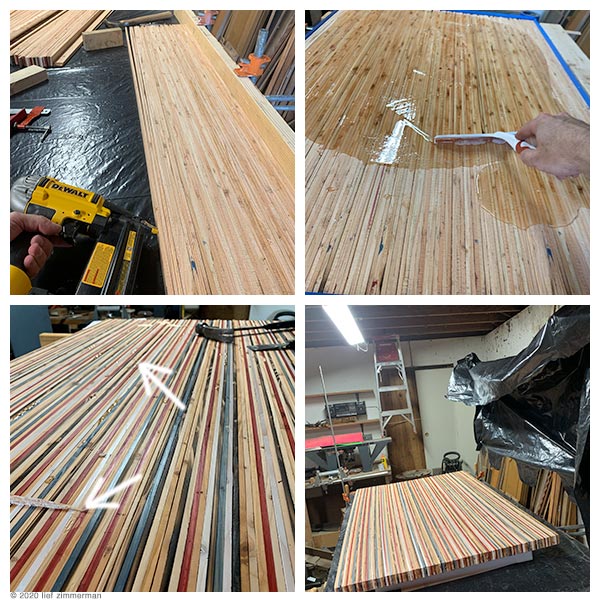
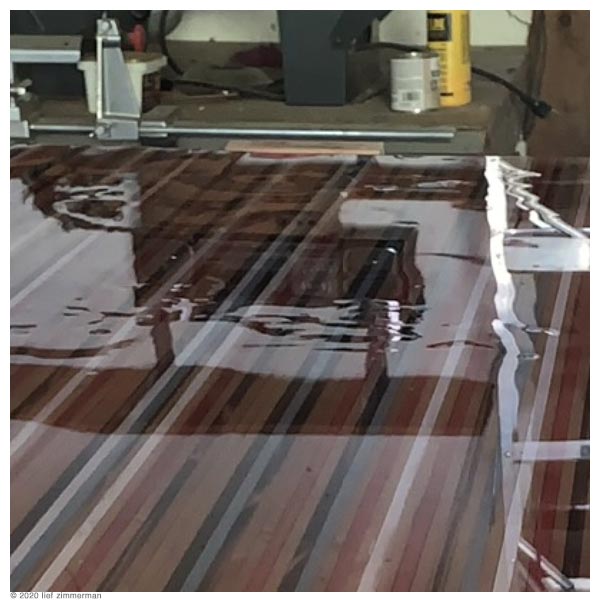
I started with the idea that I could just use lathe – I’ve used plenty of it when installing the ceilings in this house, it starts out nearly even; so I would save some milling time. I thought. I decided that I would just stain some random number of pieces in red, blue, white, and even add in some black by way of a torch. This is my Proof Of Concept I did in one-evening.
I’ve always been a sucker for stripes and, well, the decor in my office has a theme so; I figured it would coordinate without being too specific.
Me likey; time for full production. +1 for agile design.
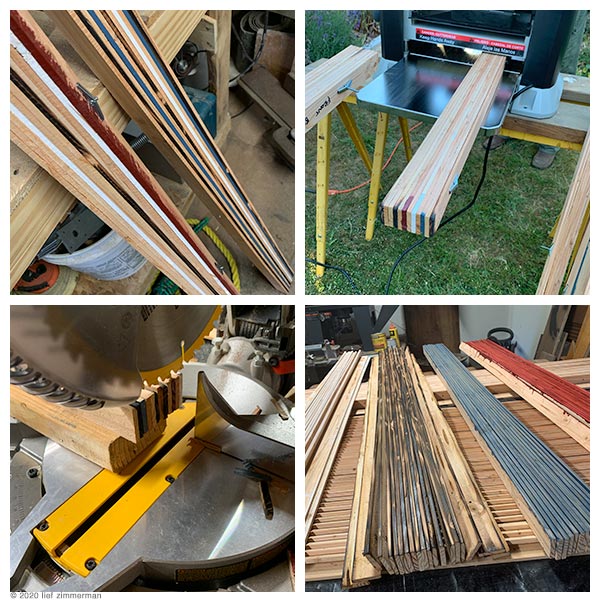
After some conversation with BopOp and thoughts (read as lessons learned on YouTube epoxy tables) on just how even I should make it I decided to bundle them into pieces using molly-bolts and run them through a planer. In retrospect that effort was worth it – the epoxy I chose (table-top epoxy) doesn’t go on thick enough in 1-2 coats to ‘fill in’ all the gaps that I would have had if we hadn’t planed it. +1 for saving 3-4+ layers of epoxy.
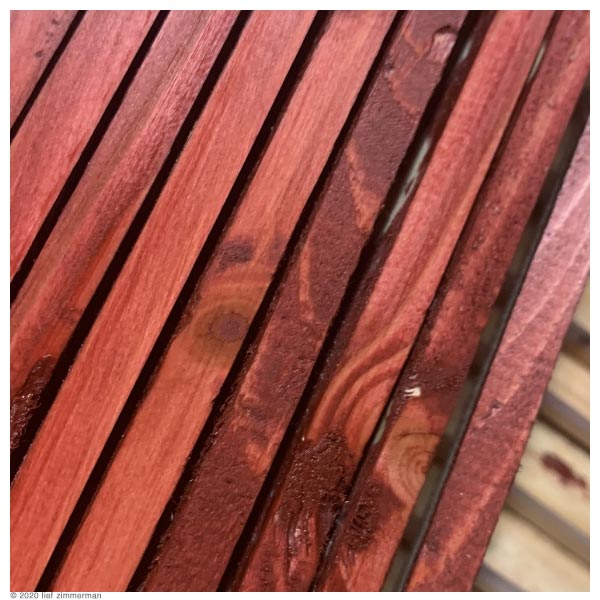
Then, after some more thinking I decided to even up the ends a bit too. +1 for evenness. And finally I chose to rub-in the stain – NOT to paint it on. That lets some of the grain show through. I also stained some of the naked ones with a readily available maple-colored stain I found in my barn. +1 for aesthetics.
So far, if you are not keeping track, that’s +4. But I said there were some ‘lessons learned’ – here they come.
The day I started laminating I felt it was just taking too long, so after about 25 rows I just nailed the pieces without glue. Using ‘finishing’ nails. That resulted in a very weak cross-section. I did also finish with glue on the last 20+ rows but…the glue dries very stiff; nails? not so much. -1 for impatience.
And, I’m calling it a feature now but I worked from the back to the front and minor imperfections along the way led to a slight bowing of the pieces that I just couldn’t get rid of. Not a full -1 but…the nails that came out the top because I got too close to the edge were a pain. -1 for the nails and bowing as a unit because it didn’t do what I intended but, in the end, I kinda like the svelte bow I’ve got on the front edge.
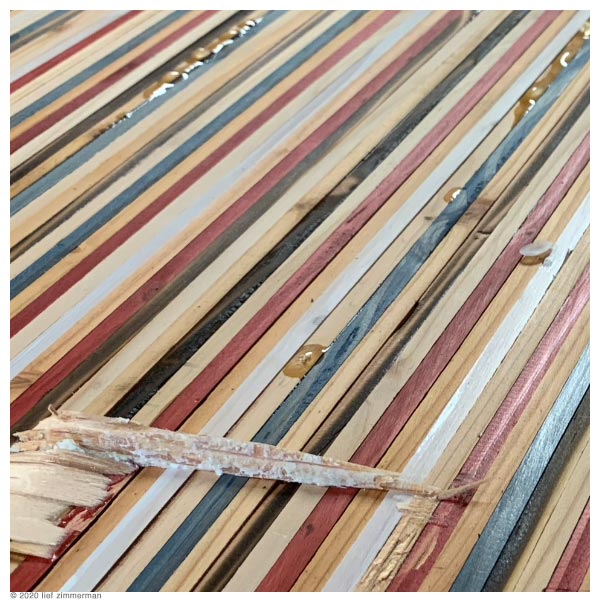
Oh – and then after testing out the epoxy on the bottom, it turns out, there are some wee little gaps in between my non-sanded edges, and non glued laminated pieces where this thin epoxy flowed into. It dried into pretty hard drip-lumps on the finish side. That cost about 3+ hours of very delicate carving with a very small chisel, followed by some gluing back in pieces that broke when I took it off the 2×4 stand, some tactical sanding, and then some tactical RE-staining of bare boards. -1 for time wasted not prepping the boards better and gluing the whole thing.
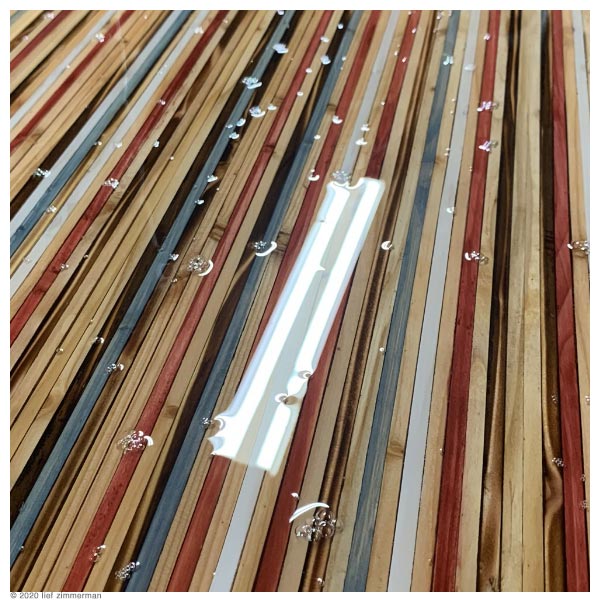
Finally, after a couple extra nights, I got the top into a good-enough place to pour the epoxy. I needed 2 quarts to minimally cover my top but I didn’t have a big enough container to hold it all so I made 1 quart, poured it, and then quickly made up the second one and poured it on right away. -1 for not getting the right 1/2 gallon mixing bucket.
It would all act like one batch right? Wrong.
The first layer was already curing and when I poured the second layer. Add that to the unsealed boards and I got a lot bubbles that just wouldn’t stop bubbling; all night. I torched the crap out of them but not enough to stop them all. -1 for trying to be faster than the epoxy.
oh…we are at a grand total of -1 right now. (+4 & -5).
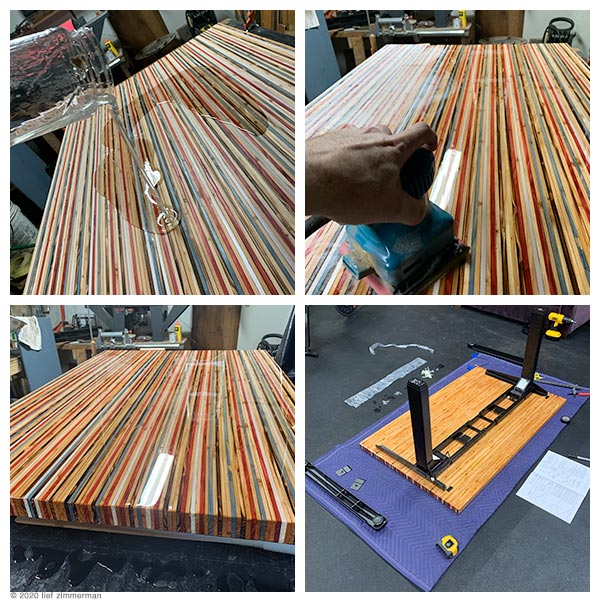
So, I sanded off the high-spots (again thank you to YouTube for a lesson on how best to do this)…and poured on another layer of epoxy.
I did an okay job on this second coat. There were a few noticeable low spots, but most of them can only be seen if you are looking at just the right angle and in just the right light.
A favorite quote I use a fair amount these days came to mind,
Laugh at perfection. It’s boring and keeps you from being done.
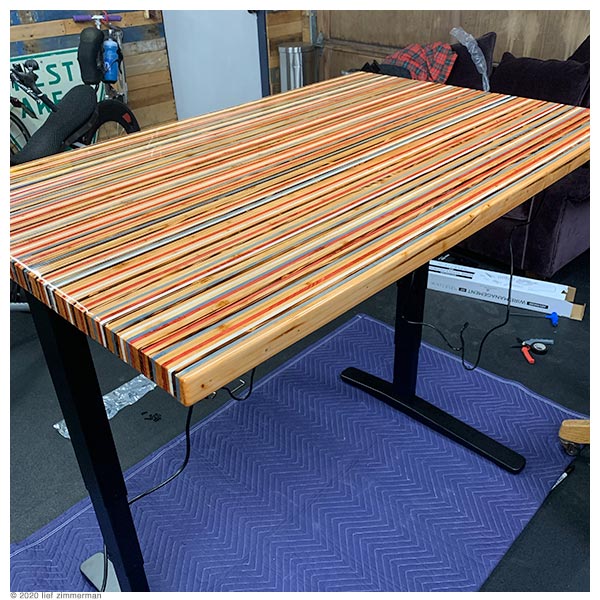
So I plowed on; content with the overall look and ready to begin the install.
The UpLift instructions were good and with a couple extra measurements taken here and there I successfully drilled everything perfectly, mounted, and tested the electric motor. Bueno. The surface was still not 100% cured, there were some dents in it after being upside down on the blanket for a couple hours. But, I’m on day 3 now and they have all liquefied away again so, I guess I got that going for me.
Last steps, clean up our neglected office and craft-room; essentially our real life version of a junk drawer room of requirement. That took the better part of 3 days with LOTS of coordination around the house (i.e., some of the stuff that came out still hasn’t made it’s way back to it’s final landing place.)
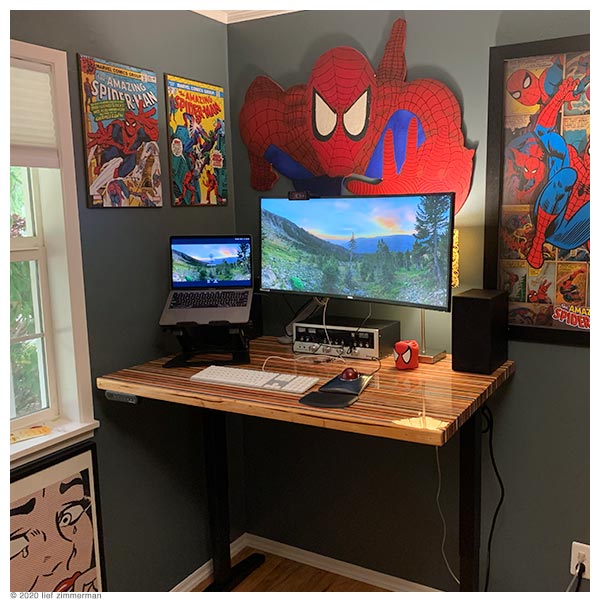
So, several weeks later, more $$ than I expected to spend on a ‘cheap but cool’ table-top, and probably ~30 or more hours of labor, I have a work-from-home desk that I’m typing at now and I love it.
Finally – the theme is revealed.
Makes me want to do more lamination and epoxy projects.
A couple years ago, or 5 months ago in Covid time, La Grande told me, in a fit of exasperated and weary anti-acceptance,
I just want to do something. I just want to go somewhere.
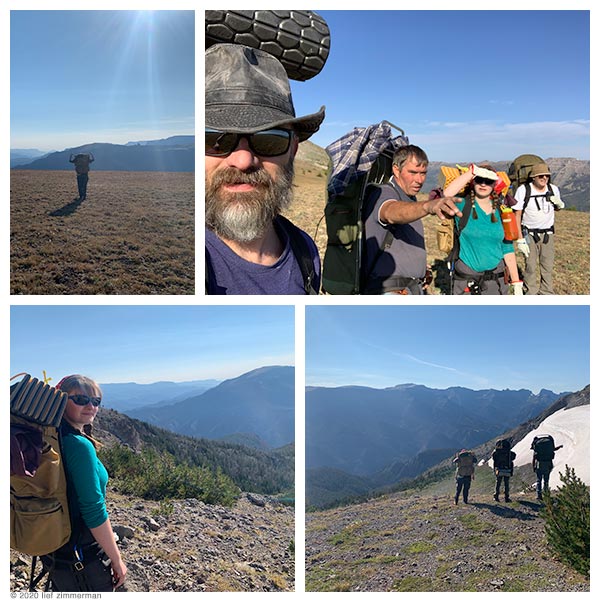
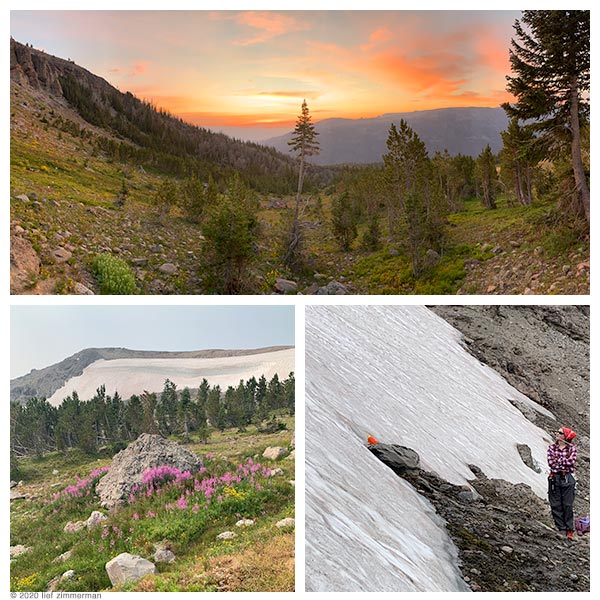
The conversation that followed resulted in a planned week-long trip to Wyoming, with BopOp, to meet Cousin Louie and hike to Mooney Meadows. We would continue the near-annual pilgrimage1 and continue working on extracting the airplane wreckage left near Howell Mountain in the Shoshone National Forest. Planning, exercise, beard-growing, equipment, and some hiking practice followed in imbalanced amounts.
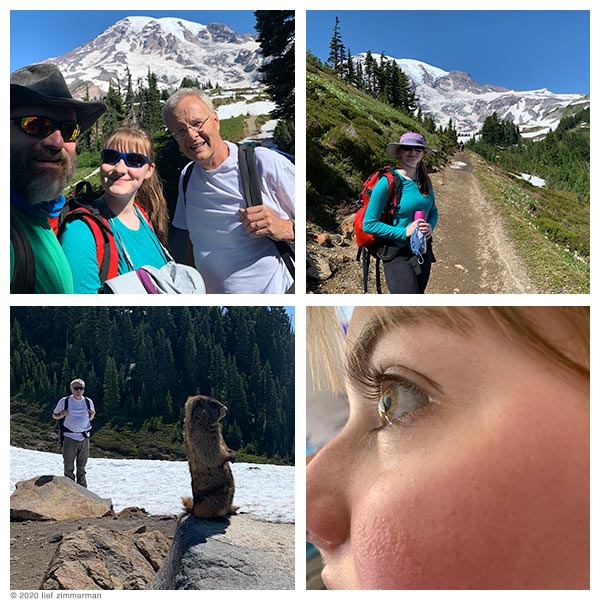
For LaGrande (and to some extent myself) this was going to be a dip into the deep-end of the pool. In our first (only) practice outing we learned a bit about elevation, snow & ice, and sun.
started with smiles and marmots – ended in sun-burn-blisters.
The day to leave came soon enough and, after driving straight through to Cody on a Saturday, we began our hike about 9:30 on Sunday morning. There was an air of excited anticipation and, admittedly, trepidation.
We were right to be anxious, the day grew hot and long, our feet grew tired, and we over-estimated just how far we could go in one day. ~30 min before sundown we made an abrupt stop roughly 1/4 mile from the top with JUST enough time to setup a ramshackle (and sloping) camp on the hillside in the trees.
This may have been the least comfortable nights ‘sleep’ in – maybe forever.
Our abused feet were needed, on a down-slope log, to keep us from squirting out of the tent; nearly the same as sleeping standing up. Around midnight I jammed my walking stick under my rear, like a wee ledge, so I could take weight off of my feet. If anyone ever claimed I had a stick up my butt, on this night at least, they would have been right. Every human on the slope that night couldn’t wait for light to come so we could keep moving.
When the light did come, without much water, we broke camp hastily and finished our ascent. The view was amazing allowing us to revel in our accomplishment, admire the sights, and discuss briefly what was ahead.
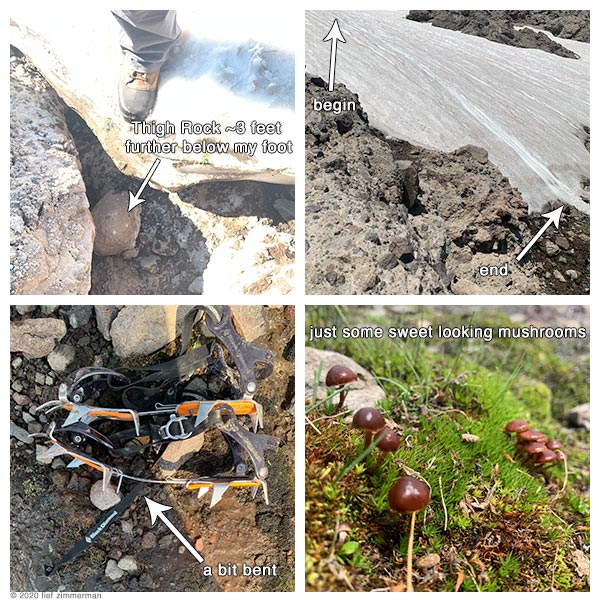
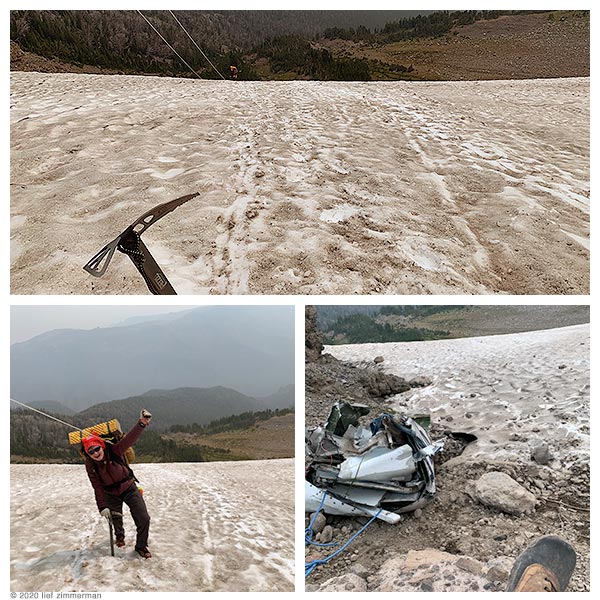
That is when some trouble started. Spoiler alert: it was our only real, or unexpected, trouble for the rest of the trip. First, a large ~40lb boulder, loosed above me, arrested it’s brief descent on my left thigh. That night I was convinced the pounding would, for sure, be a problem for the remainder of the week. Lasting injury never materialized and, in retrospect, the event looked a lot worse than it was. The same can probably be said for the second event a few short hours after the boulder when, tired and thirsty, LaGrande and I were completing the last few moments of our glacial descent. I lost my crampon-footing about 60 feet from the bottom and only finally arrested my descent with my feet, on the rocks, at the bottom.
The wreck reminded me of a 15mph bicycle accident, or perhaps jumping off a low roof. The ceremony lasted only a few seconds and I ended face-down in an icy cold creek with forty pounds of our ‘possibles’ holding me down. We took that lesson seriously and used our tools (crampons and ice-axes and lead line) more deliberately going forward.
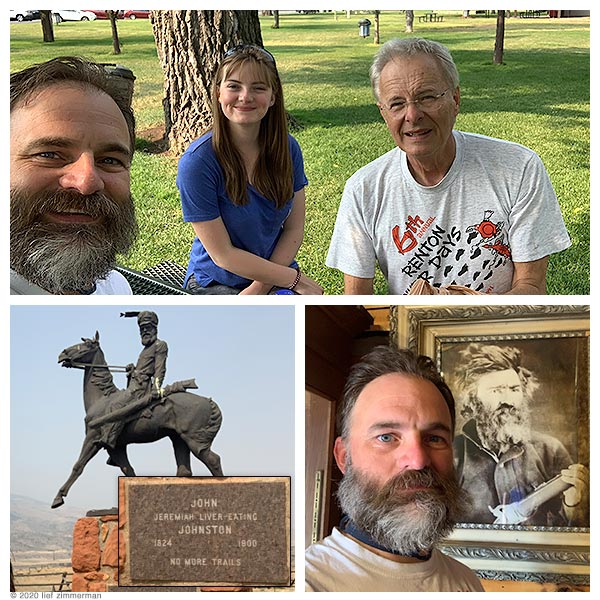
For the next few days we acclimatized to the rigors and sights; remarkably cold water, rough sleep, tiring efforts, fast-beating hearts, glorious views, pretty flowers, and questionably-tasting (yet oddly satisfying) foodstuffs. Even made time for a few selfies.
Top Left – the heaviest piece was ‘owned’ by ‘Little Cousin’.
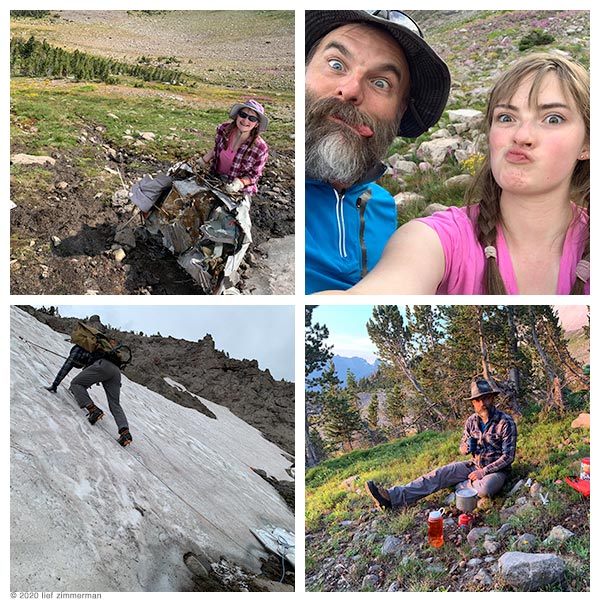
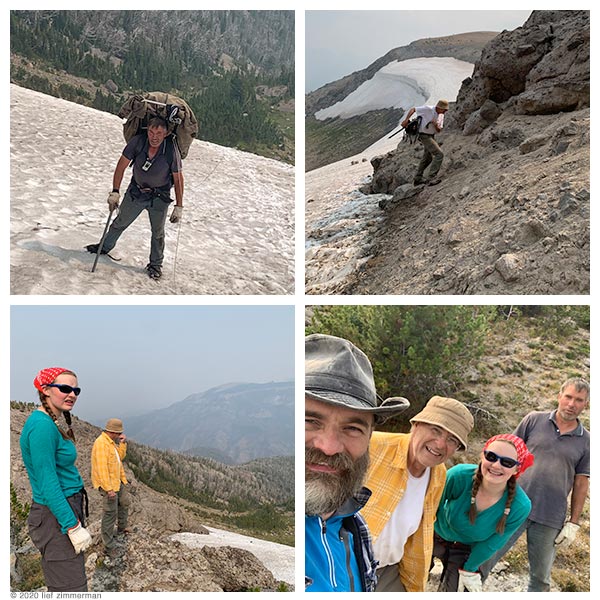
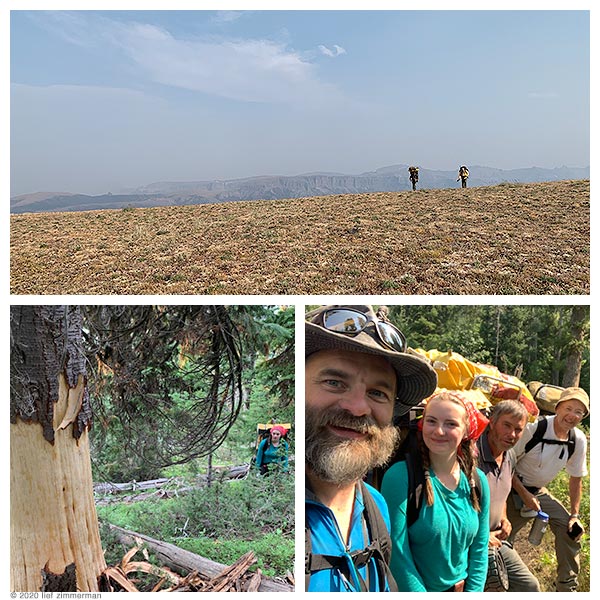
Over two full days, and using the pulley system devised by BopOp for this 2020 trip, we raised nearly all of the scrap to the top of the glacier – there is only a fraction remaining in the meadow. Because we took an extra day coming in we exercised our option (planned flex day) to extend our stay one day. This decision gave us a bit of ‘time’ to consider other fun activities and plan our extraction. The plan included departing, up, and over the glacier with full packs; slow, tied in, deliberate, and fully fed. Once at the top we would stash the remaining raised pieces near the crest and then walk to Paradise Valley for our final night in the hills. This would leave only an easy 7 miles out the following day.
The top pic shows the ‘scale’ of the climb – follow the lines to the Little Cousin.
This penultimate act took many hours and we all notched our mettle by ascending the glacier with full packs and then hefting the remaining wreckage up the cliffs, by hook or by crook, to their temporary resting place in the small trees at the top.
We finished at the meadow by rolling some pesky rocks and then had a bite and a brief fight with the wind, and then eventually moved down to Paradise Valley.
Along the way, LaGrande finally got her wish; to see a bear at a distance. The rest of us only saw the verifiable bear sign on a tree.
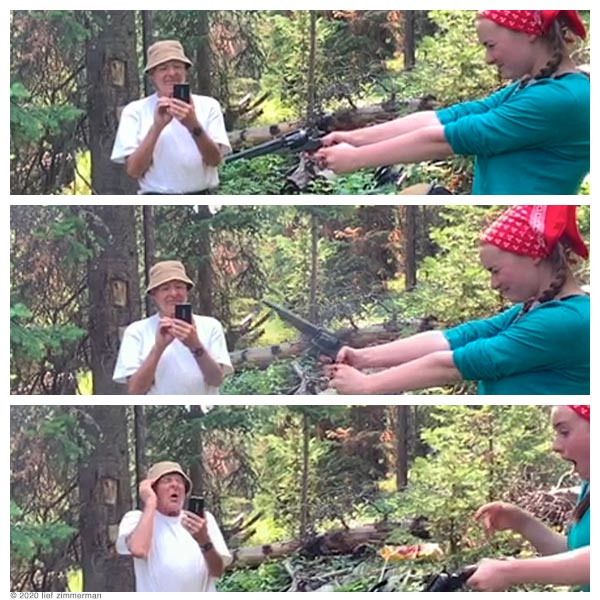
Perhaps a mile from the end of the trail LaGrande laid to rest another bucket-list item for the trip – taking two shots with Cousin Louie’s 45 Colt Long. I took these stills from a slow-mo video – they tell the story just as well using less bandwidth.
“the password is LOUD“
We got off the trail about 4PM, feeling as good as ever, had an early dinner with Louie, made for the showers at the motel, had a (second) late dinner in Downtown Cody, hobbled (literally) around the closed up tourist area, and melted into a good nights sleep.
This may have been the most comfortable nights ‘sleep’ in – maybe forever.
The next day included a grocery-breakfast, some tourist-ing – paying a small homage to Jeremiah Johnson, and then a fair bit of driving.
We capped the drive with an entertaining search for a hotel in Coeur d’Alene, Idaho between 10-11PM. Needless to say we stayed in Spokane around midnight, had another deep recovery sleep, and then included some practice driving a stick-shift (#bucketlist).
We finally arrived home, safe and sound, by about 3PM on Sunday – 8 days in all.
TheWeeOne was being roused by LaGrande for her first day of school this morning. I came into the room to find the two of them on the bed. TheWeeOne pointed at me with sleep in her voice and said –
I had a dream about you, but you were fake.
I laughed jokingly, with LaGrande, in mock offense. Then to soften the blow TheWeeOne added,
It’s okay, I was fake too!
Increased laughing…
No really! We were, like, imposters!
And so begins Virtual High School – class of 2024.
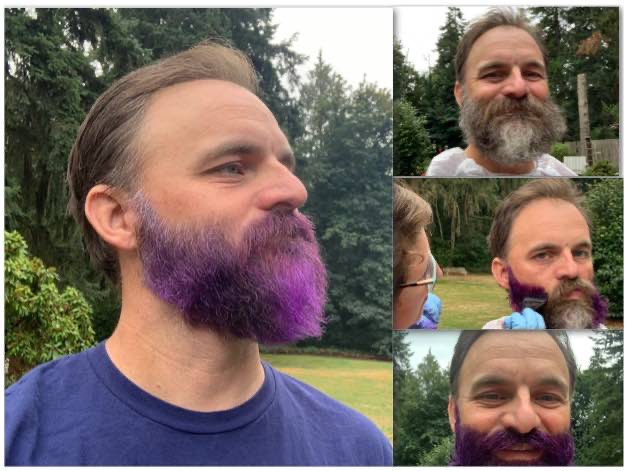
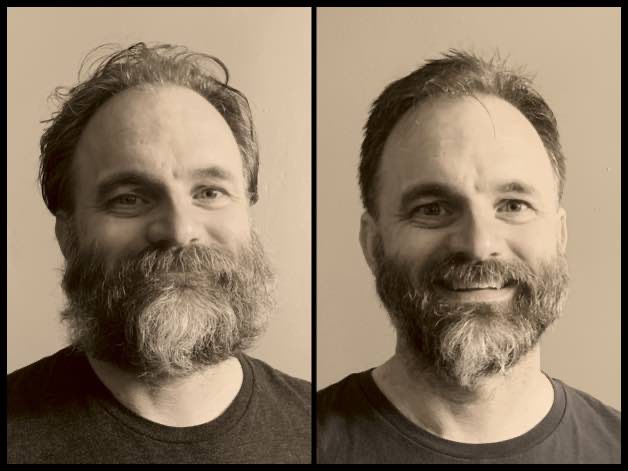
Ok – so this was a couple days ago to be fair, and this is also going to be my last “planned” covid-19, quarantine related post. LaGrande helped me decide about 30 days in that I wouldn’t shave “until this is all over”.
Well – that changed at about day 60, with a passionate request from TheMommy, so we agreed to throw a dart WAYYYYY out into the impossible future – 120 days! Or the end of our quarantine effort, whichever comes first.
Arguably, we might have called “forced” isolation as over before the 120 day mark – but well…let’s just say now we know what 120 days looks like.
Turns out I could have almost body-doubled for Robin Williams in Jumanji.
First things first – I’m not counting in days anymore. Maybe I’ll start counting in centimeters? – by the length of my quarantine beard. 🙂
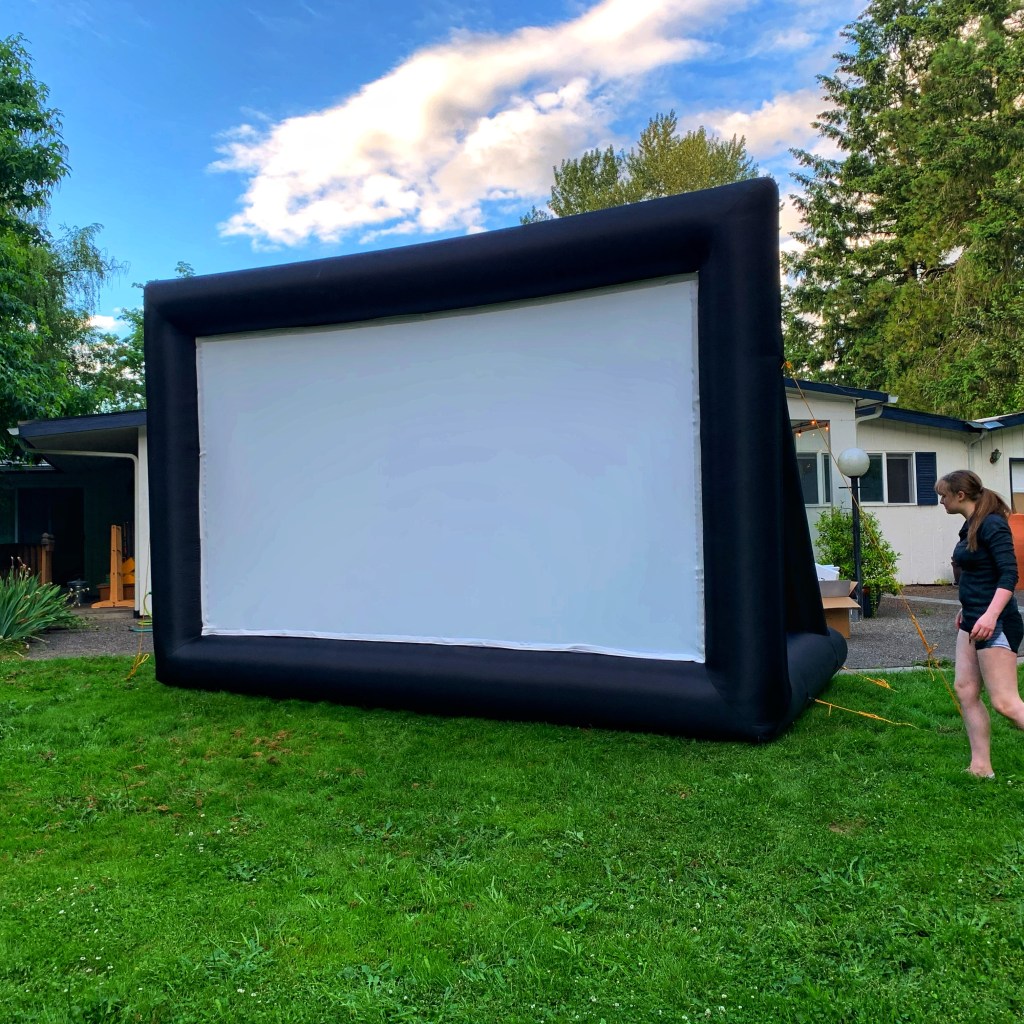
That uniqueness aside, and in an attempt to bring some additional/interesting options to our coming summer physical distancing efforts, I ponied up for a projector and an outside movie screen. (Daughter for scale)
I was surprised, sorta, at the overall size – 20 feet looks bigger than it sounds. 🙂 After a successful test later at night, it’s quite easy to fill the screen with a completely doable projection. We are looking forward to some physically distant, socially engaging, outdoor movie-nights at the Blief Drive-in & Backyard Bli-BQ